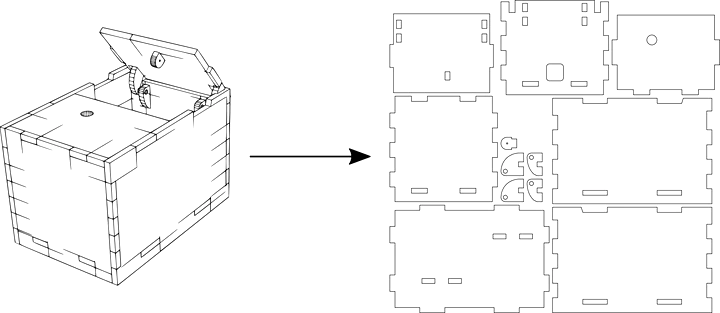
Flatterer turns a 3D model in Blender into a set of shapes suitable for laser
cutting. It’s aimed at easily exporting boxes, enclosures, and other
made-for-laser-cutting designs to SVG.
The add-on comes with an
blend file with an example box (a slightly
simpler box than the one shown at the top) to illustrate how the add-on is
supposed to be used.
Features
Automatically pack SVG shapes
✔️
Engrave marked edges
✔️
Expand cuts to correct for laser width (kerf compensation)
✔️
Aids in setting up scene for millimeter precision
✔️
Aids in adding solidify modifier for material thickness
Press the Add Solidify Modifier (available in Object mode) to add some thickness.
Press the Flatten to SVG Outline button to export to an SVG file.
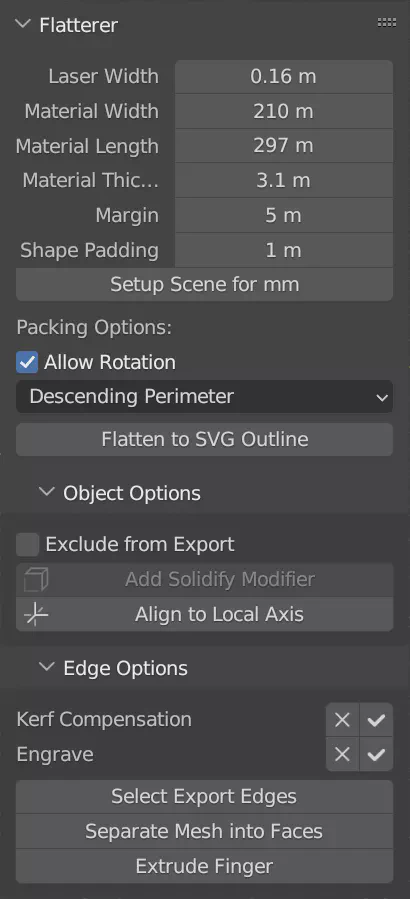
3D Viewport Panel
The add-on adds a panel to the 3D Viewport side-bar, in the Export tab.
3D Viewport Panel with options and operators.
Scene Settings
These settings are stored on the Scene; in other words, they can be adjusted for
each blend file you’re working on. The default values are set in the add-on
preferences.
Laser Width
The width of the cut the laser leaves behind, also known as tool size in
CAD/CAM software. Each exported edge is moved outward by half this width, such
that the final shape matches the Blender design exactly.
Material Width
The shape packing algorithm won’t go wider than this width. Set it to whatever
the maximum width is you want to use, depending on the material you’re cutting
and the margins you want to keep.
Material Length
Set this to the length of the cuttable material. Flatterer will output one or
more pages of width × length in size.
Material Thickness
The thickness of the material you’ll be cutting. This is used by the Solidify
modifier (see below).
Margin
The minimum distance between the edge of the material and cut-out parts.
Shape Padding
The shape packing algorithm will keep this much space between the parts.
Setup Scene for mm
Configure the Scene to use 1 unit = 1 mm. This configuration is assumed by the
exporter; it doesn’t actually take the Scene scale into account. This operator
also updates the 3D Viewport grid size to match.
Packing Options
Sorting
The packing algorithm tries to fit each shape as well as possible. It does
this basically shape by shape, and thus the order in which the shapes are packed
has an impact on the result. This option allows you to choose this sorting. The
choices are:
Do not sort. Not sure what the use is, but you never know.
Sort by descending area.
Sort by descending perimeter. This was the old hard-coded behaviour, and still is the default.
Sort by difference of rectangle sides.
Sort by shortest side.
Sort by longest side.
Sort by ration between sides.
Rotation
The packing algorithm can rotate each shape by 90° to see if that works
better. If you don’t want this, you can now turn it off.
Reduce Waste (removed in version 1.3)
This option has been removed in version 1.3. It got in the way of the
multi-page export option, and didn’t turn out to be as practically useful as I
hoped it would be.
Object Options
These options are only available when a mesh object is selected.
Exclude from Export
Prevents this object from getting exported. Enable this on helper objects if
you just want to do “Select All, Flatten to SVG Outline”.
Add Solidify Modifier
Add a Solidify modifier to the active object, with a driver on its thickness
so that it follows the scene’s Material Thickness setting. Only available in
Object mode.
Align to Local Axis
Analyses the mesh and rotates it to align its local axes with the orientation
of the mesh. The object is counter-rotated to ensure the mesh doesn’t visually
move.
Edge Options
These options are only available when Blender is in mesh edit mode.
Kerf Compensation on/off
Edges that are exported for cutting will be “kerf-compensated”. This means
that they are moved slightly to compensate for the width of the laser beam. Here
you can disable this, for those edges where you don’t want this behaviour.
Engrave on/off
Use this to mark edges for engraving.
Select Export Edges
Select the mesh edges that will be exported. This doesn’t do anything else;
it’s just a helpful tool if you want to see what’ll get exported and what won’t.
Separate Mesh into Faces
Split up the mesh into multiple objects. All faces that have the same
orientation will be assigned to the same object. This is typically used to split
up a box into its separate sides.
Extrude Finger
Select edges and press Extrude Finger to extrude them away from their faces.
The extrusion will use the material thickness. This is used for finger
connections to connect parts.
The Button
Flatten to SVG Outline
Takes the selected mesh objects, applies kerf compensation, packs the
resulting shapes, and writes them to an SVG file.
The popup where you name the SVG file also has a side-panel in which you can
enable the shape table.
Limitations
There are some limitations that I want to lift at some point, but which at the
moment of writing are still in there:
Scene scale settings are ignored, hence the Setup Scene operator.
The mesh must be planar (as in, flat) and aligned to local axes. It doesn’t
matter whether it aligns with the XY, YZ, or XZ plane, but it has to align
with one of them.
Flatterer doesn’t slice 3D shapes. Instead, it requires that you yourself
already work with flat surfaces. For slicing, use
BlenderCAM. ↩︎