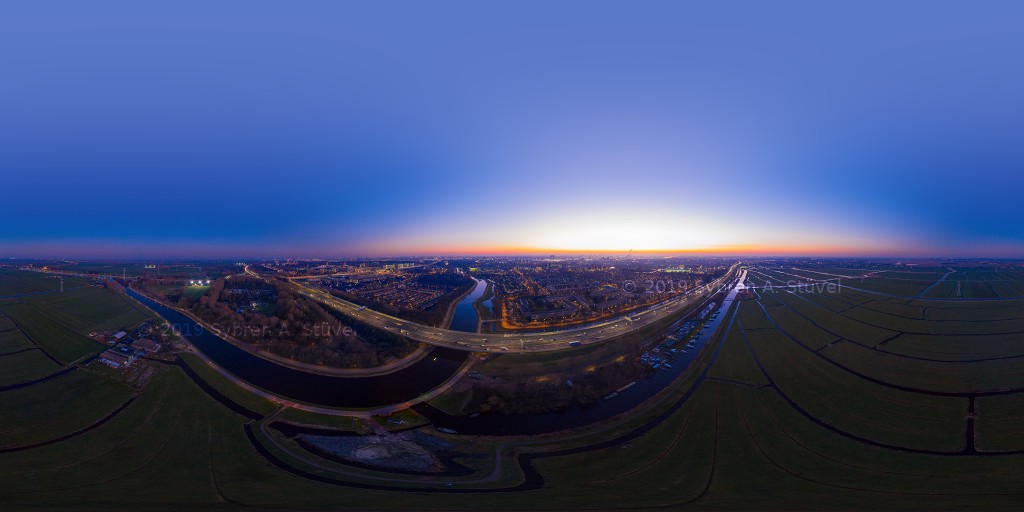
Skyfill allows you to do fill in the gap in the sky in high-resolution images. I used it for all my own drone panoramas.
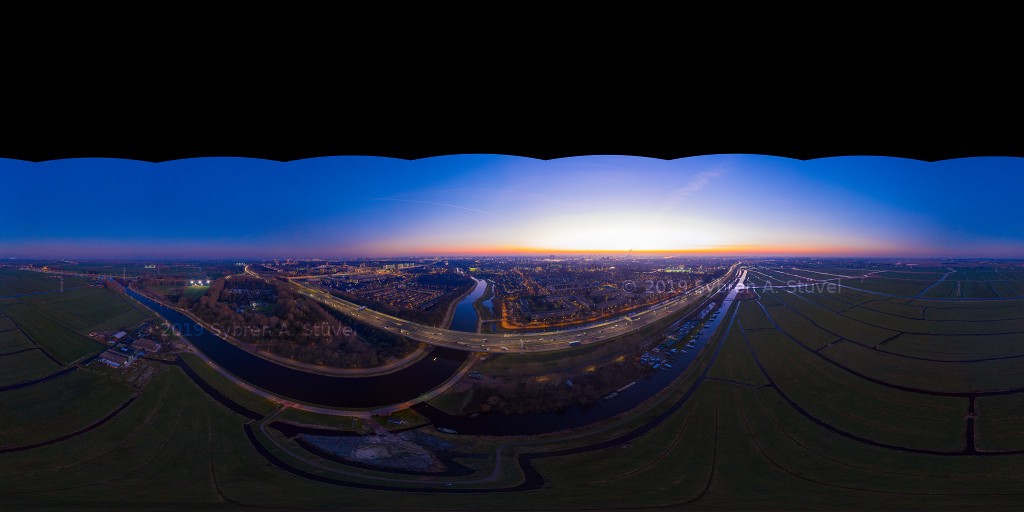
Most drones (UAVs) cannot look straight up to photograph the sky above them. As a result, spherical panoramas made with drones tend to have a gap in the sky. Some drones, like my DJI Mavic 2, can fill in this gap automatically while generating a preview. However, when I stitch the photos myself to get a better quality output, there is still that sky gap. I got fed up with having to choose between a nice sky or a nice overall image, so I did what developers do and made my own software: Skyfill.
This page is about Skyfill. I have a different article about my drone panorama workflow.
Thanks to Ork de Rooij for his help getting the pixels right.
Skyfill is a console program. This means that it won’t show a graphical user
interface, it’ll just show you some text. The simplest way to run Skyfill is
just skyfill somephoto.jpg.
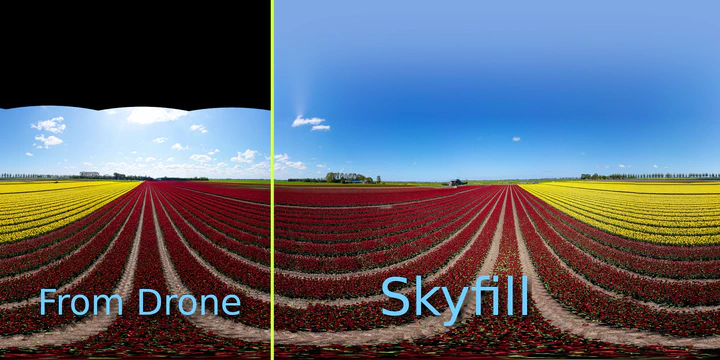
The sky part can be made a bit more interesting by creating a so-called mirror ball that reflects the ground. This results in a mini planet version of the panorama hanging in the sky. To see what it looks like, check these tulip fields and be sure to look up.
Run Skyfill with skyfill -mirrorball input-file.jpg to enable this mode.
The simplest way to use Skyfill on Windows is to just drag & drop the image onto
skyfill.exe. The way I personally use it is with a shortcut on my desktop,
which I can drop images onto. When you drop somephoto.jpg onto it, it will
create somephoto_filled.jpg in the same folder.
To get the mirror ball, you can edit the shortcut to run skyfill.exe -mirrorball.
Run skyfill -help to get a list of all the options that are available to you:
-adobergb: Treat the input image as AdobeRGB. Without this option, sRGB is assumed.
-blend percentage: Skyfill blends the generated sky into the photo, to prevent
a hard edge between the generated and the real sky. This parameter determines
how large the blend will be. For example. with skyfill -blend 20 photo.jpg you
will get a soft blend that is 20% of the height of the sky gap.
-lower-sky percentage: Lowers the sky boundary, in percent of detected sky gap
height. Use this if you want to tweak the result of the automatic sky gap
detection. For example, use skyfill -lower-sky 20 photo.jpg to lower the sky
by 20%.
-sky pixels: Height of the sky gap in pixels. Disables automatic sky gap
detection. For example, to only fill the top 100 pixels, use skyfill -sky 100 photo.jpg.
-quality percentage: Set the JPEG quality of the output file. Valid values are
0-100, and 90 is the default. Only used when actually writing JPEG, of course.
For example, to write larger files with pretty much lossless compression, use
skyfill -quality 100 photo.jpg.
-quiet: Disable info-level logging, and only show warnings and errors.
These options probably aren’t that interesting for producing nice photos, but are very useful when working on Skyfill itself.
-bounds: a debugging option. This draws two horizontal lines, below & above
the blend area.
-debug: Enable debug-level logging, so you get a little bit more information
about what’s going on behind the scenes.
-samples: Show sample points as red pixels.