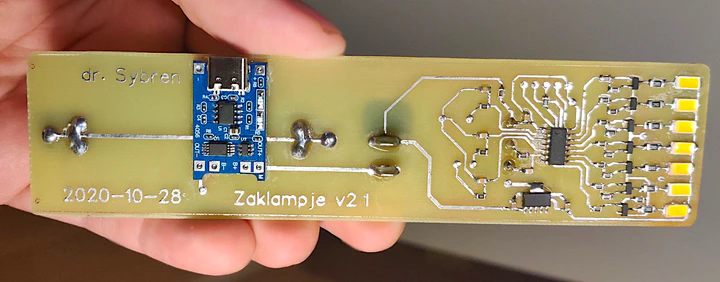
PWM and Visual Brightness
When you want to control a light with a microcontroller
UPDATE: I’ve made an online version of the script too. So if you just want to get the values, go there & use it directly in your browser.
For my microcontroller projects I often want to convert some linear value (like a potentiometer position) into a light intensity. Since our eyes aren’t linear, this requires some math, and generally microcontrollers aren’t that good in math.
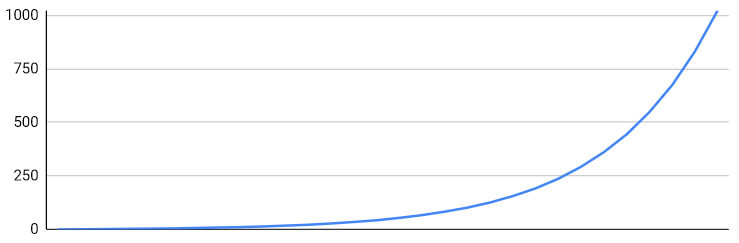
Our eyes roughly experience a doubling of the amount of light as a single “step”. Double it again, and we perceive it as a similarly-sized step. This means that, for our eyes to perceve the light becoming brighter linearly, it actually needs do that exponentially.
My microcontrollers use either a 10-bit or 8-bit value to contol the brightness.
This provides a bit of a technical hurdle, because the exponential growth of the
light’s brightness actually starts out really slow. Converting that slow start
to a sequence of integers would produce a sequence like 0 0 0 1 1 2 3 5. Those
repeated numbers mean that whatever you use to control the light (like up/down
buttons) will appear to do nothing at first. To prevent this, my script will
simply start with linearly increasing numbers, like 0 1 2 3 4 5, before moving
on to an exponential slope.
Using the script
UPDATE: I’ve made an online version of the script too. So if you just want to get the values, go there & use it directly in your browser.
The script needs
Python to run. Download
sybrens_light_intensity_script.py, save it, edit it in a text editor
to adjust the parameters to your needs, and run it. It will output a few lines
of C code that can be used for microcontrollers.
Example 10-bit output
This is what will be printed with the default settings of the script:
- 10 bit intensity values
- 30 steps in total
- 6 linear steps to start with
static const uint16_t light_map_10bit[] = {
    0, 1, 2, 3, 4, 5, 7, 9, 11, 14, 18, 22, 28, 35, 43, 54, 67, 83, 102,
    126, 156, 192, 237, 293, 361, 444, 548, 674, 831, 1023};
Example 8-bit output
This is what will be printed with some modified settings.
- 8 bit intensity values
- 30 steps in total
- 4 linear steps to start with
static const uint8_t light_map_8bit[] = {
    0, 1, 2, 3, 4, 5, 6, 7, 9, 10, 12, 15, 18, 21, 24, 29, 34, 40, 47, 54,
    64, 74, 87, 102, 118, 138, 161, 188, 219, 255};
How I use it
The values in the light map produced by my script are fed to a Pulse Width Modulator. These simply count up until their maximum (1023 for a 10-bit one) and then restart at zero again. When they start counting, they turn on the light, and when they go past a given value, they turn off the light again. The higher the value, the longer the light stays on, and the brighter you see it. This happens all thousands of times per second, so to our eyes the light is stable, even though it’s actually rapidly blinking.