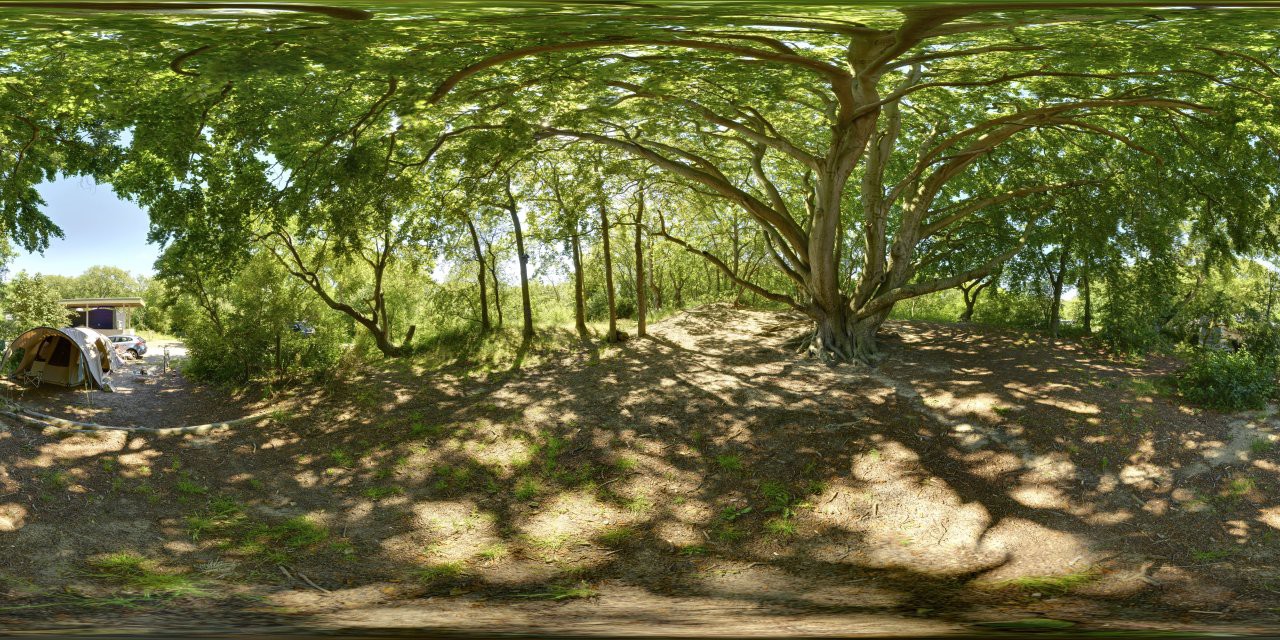
Spherical Panoramas
This page describes my workflow for spherical panoramas made from a tripod on the ground. The goal is to produce a panorama photo covering 360° horizontally and 180° vertically. The photo will be of normal dynamic range, such that it can be viewed in an image viewer, embedded on a website, or shown in a VR set. For producing HDR images, most of these steps can also be used, but you’ll have to use your own brain for the final steps.
Taking the Photos
My camera is a Fuji X-S10 with 18-55mm kitlens. Basically any camera can be used for this type of photography, as the special thing that makes it work is a panoramic tripod head. Personally I use a now decade-old Nodal Ninja 3. This tripod head ensures that you can rotate the camera without the perspective changing – this means photos taken from any angle can be stitched seamlessly.

For a single panorama I shoot a multiple of 38 photos. First are three full 360° circles, consisting of 12 photos each: horizontally, looking down 45°, and looking up 45°. Then I shoot another photo looking straight up.
After that comes the most difficult one, looking straight down. For this one you want the tripod to be out of the way, so that you photograph the ground instead. I just grab the camera + the tripod, turn the entire combination 90 degrees and do my best to rotate around the right point. Keep an eye on the direction of the sun so you can avoid shadows of the tripod now hanging in the air.
The exact number of photos depends on the dynamic range of the scene. Usually I use exposure bracketing, and take 5-7 photos of different exposure for each “photo” described above, resulting in 190-266 photos in total. Of course all are shot in raw to get the greatest dynamic range per photo.
Tweaking the Colours
To get the colours of the final photo just the way I want them, I edit the DNG files in Capture One. This is done at this stage, before stitching them, so that the software “sees” normal photos. This means that it can do its usual work of lens distortion correction, removing chromatic aberation, etc. You can do colour grading as well, but be sure to sync all edits between all photos. Each individual photo has to get the exact same treatment. Regardless of the software used, turn off any “smart” feature that analyses the photo and automatically adjusts things.
Doing the colour tweaks in the individual shots also prevents a visible seam between the left and right edge of the final image. These edges have to have the same colour to make the panorama seamless, but most photo editing software doesn’t take this into account.
When processing is done, either export as 16-bit TIFF or 8-bit JPEG files. Often I’m lazy and go for the faster workflow that 8-bit JPEG gives me. For the highest quality you can choose to export to 16-bit TIFF, and have the rest of the workflow with that bit depth. In the remainder of this article I’ll assume JPEG because the steps are really similar anyway.
Stitching the Photos
For stitching the photos I use Hugin and a custom assistant script. Hugin also handles the HDR merging in a really nice, natural way.
The Assistant
Hugin supports user-defined assistant scripts. These are great for automating things, and I wrote one that positions the photos in roughly the correct positions, given my way of shooting.
Download the assistant script
pano-hdr-5.assistant and place it in the appropriate directory. On Windows this is %APPDATA%\hugin\dji.assistant; on Linux I have to check, probably somewhere in $HOME/.local/share/hugin.
This script is set up for 5 exposures per position. If you use a different count, just copy the script, open it in a text editor, and replace every imagesPerStack=5 with whatever count you use. Be sure to also update the description at the top of the file where it says 5x HDR; this is what you’ll see in Hugin’s menu.
These assistant files are read by Hugin at startup, so if you already started Hugin, quit the application.
Starting the Project
Start Hugin and drag in the exported JPEGs from the previous steps. Choose Link Positions in the popup. This will connect every exposure bracketed stack of photos, moving them around like a single shot.
When you have loaded photos into the project, go to Edit, User defined assistant, Pano (5x HDR, 12xMID/DOWN/UP, 1xUP, 1xDOWN) to run the assistant. This will compute the rough positions of the photos, and do a first pass to find control points.
Adding More Connections
Chances are that not all photos are connected now. To figure out which pairs of photos still need connecting, open the Layout tab of the Fast Panorama Preview. Overlapping photos have a line drawn between them; the thickness indicates the number of control points, and the colour indicates the quality of the fit.
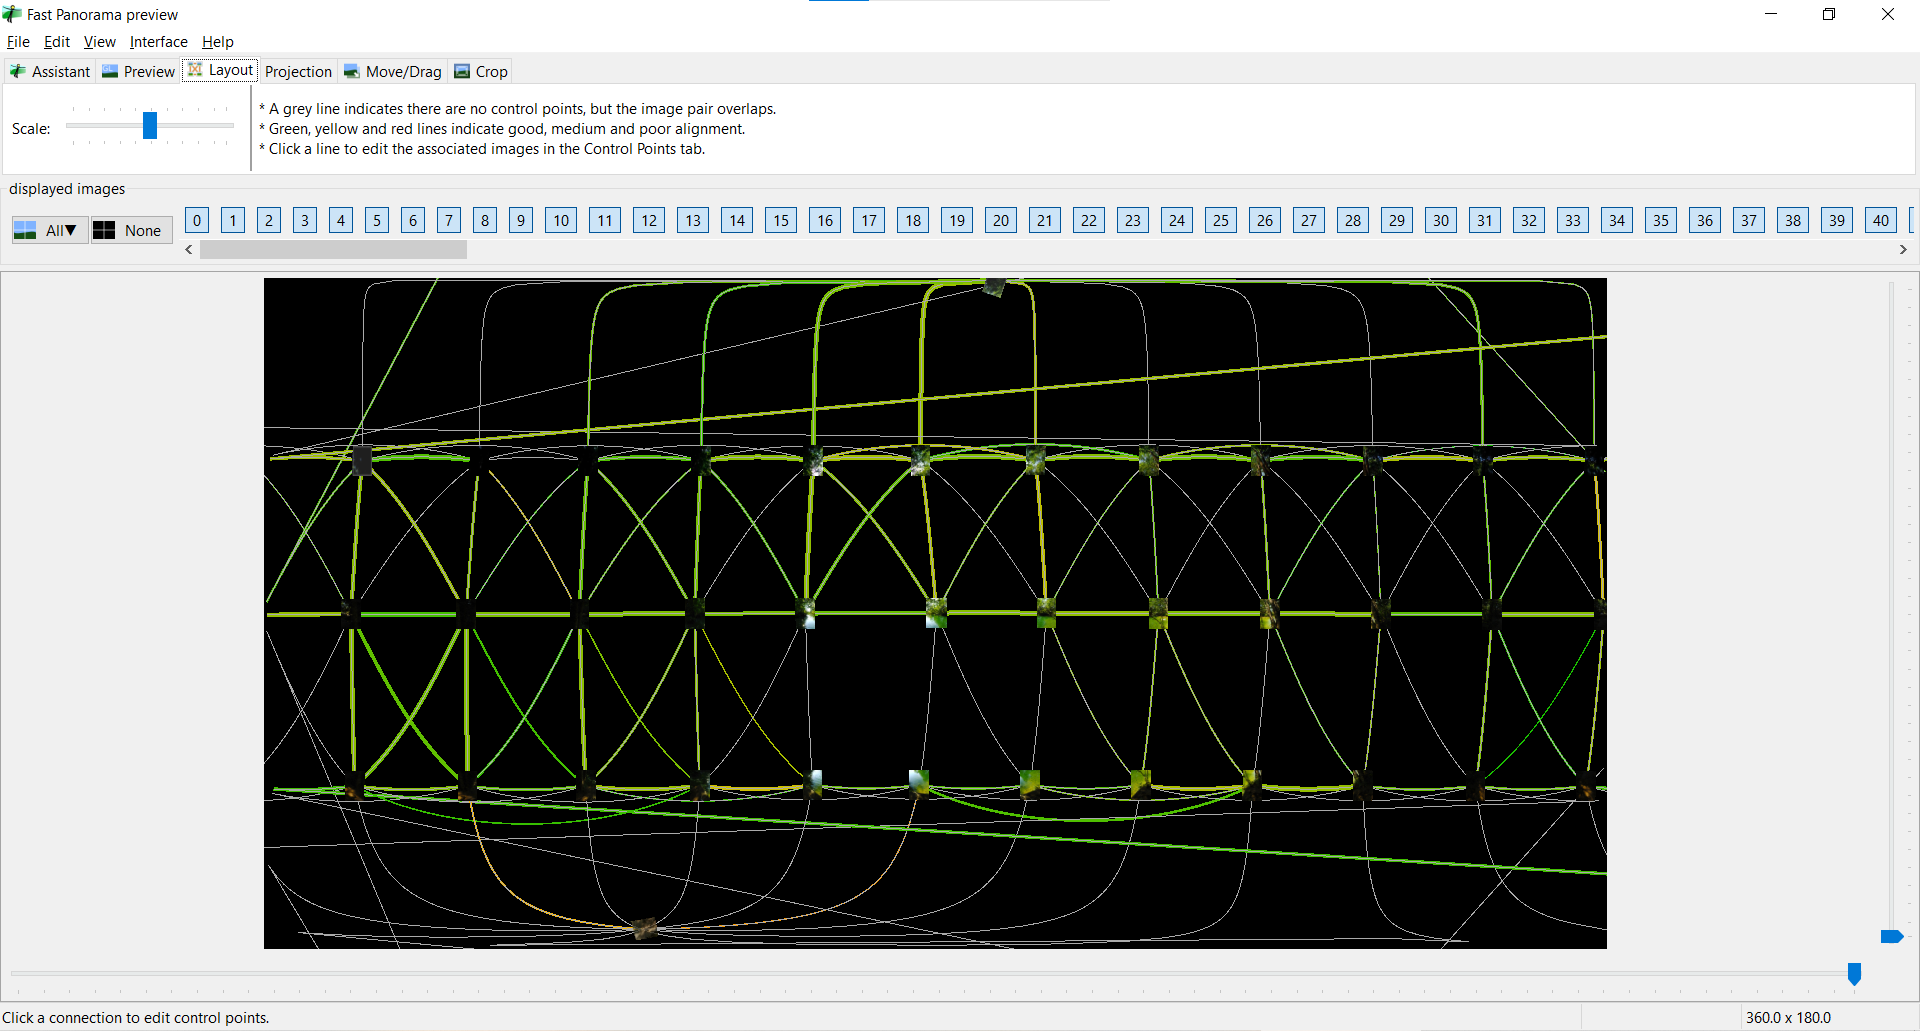
Thin grey lines indicate an overlap without control points. If you feel that these images should be connected, click on the line. This will switch Hugin to the control point editor with two images of the two HDR stacks selected. If they are too bright or too dark, use the green left/right arrows to switch to other images. Once you have a suitable image pair, press the Create cp button to let Hugin find control points for you, or add them manually one by one.
Optimisation
Optimisation is the process in which Hugin moves photos around to make them fit as well as possible. In the Photos tab you can choose the type of optimisation. For the first run, choose Positions (incremental, starting from anchor). This optimises only a few parameters, meaning that badly placed control points cannot mess up too much.
Press Ctrl+T to run the optimisation, then take a mental note of the max error reported and accept the result. Now press F3 to get the list of control points and delete the worst-fitting ones. Usually anything with an error above 10 can be deleted, but it’s really up to you to decide this given the errors you see. Just delete the worst ones.
Further optimising is done with Positions, View and Barrel to align the photos exactly. This not only tweaks the photo positions, but also corrects the field of view and the barrel distortion. You should see a dramatic reduction of the reported max error. If needed (this is always needed), I press F3, delete the worst control points, and repeat the optimisation until I’m happy. Usually a maximum error distance of 3.0 is good enough at this point.
The Shot Down
Usually I wasn’t perfectly accurate when doing the float the tripod in the air and try to not to move it around too much part, i.e. shooting the downward photo. Sometimes it helps to select the last HDR stack in Hugin’s list of photos, right-click, and choose Lens, New Lens. This will make it possible for Hugin to adjust its field of view to make up for not using the tripod in this shot. Sometimes it works, sometimes it makes things worse, so make sure you save the file beforehand.
Stitching
For the Canvas Size (the final resolution) I generally use 16384 x 8192 pixels as a high-quality output or 8192 x 4096 for a more manageable image.
For Panorama Outputs I choose Exposure fused from any arrangement. This will first stitch all photos of a similar exposure into full panoramas, and then do the HDR merge to combine those into the output file. To me this feels the right way of doing things; as the HDR merging takes the surroundings of each pixel into account, doing that on fully stitched panoramas just makes sense to me.
In the Blender/Enblend options, I set them to --blend-colorspace=CIELAB -d 16. Without this, I get strange artefacts in my stitched results when outputting such high-res files.
Final Tweaks & EXIF tags
If you chose to use 16-bit TIFF files, Hugin’s output will also be a 16-bit TIFF. Just load it up in your favourite editing software, do some final tweaks, and export to JPEG.
To tell other applications this is a spherical panorama, you need to add some EXIF tags. This isn’t always necessary, so play around and see what you need. I use ExifTool for this:
exiftool -overwrite_original \
    -ProjectionType=equirectangular \
    -UsePanoramaViewer=True \
    -"CroppedAreaImageWidthPixels<ImageWidth" \
    -"CroppedAreaImageHeightPixels<ImageHeight" \
    -"FullPanoWidthPixels<ImageWidth" \
    -"FullPanoHeightPixels<ImageHeight" \
    -CroppedAreaLeftPixels=0 \
    -CroppedAreaTopPixels=0 \
    "panorama-filename-here.jpg"
Showing the result.
The final result is embedded on my website by using Pannellum. Because the JPEG is 134 megapixels, I use their multi-resolution panorama approach. This works really well; it makes my website lighter for visitors, and also reduces the bandwidth consumption of my webserver.
On Android I use F-Stop to view panoramas. It requires the above EXIF tags to recognise the photo as panorama. On iOS I use Spherualizer.